Spooky Halloween Blue and Orange Non-Alcoholic Drinks
These spooky non-alcoholic drinks are perfect for Halloween parties or to enjoy just because. They’re easy to make and festive inside and out.

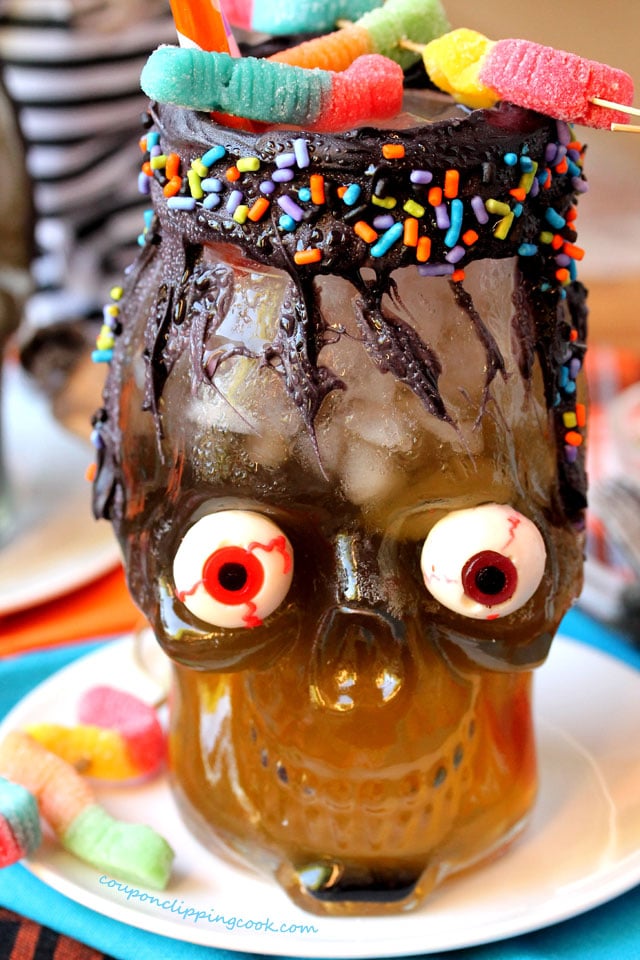
A spooky multicolored drink, candy worms, candy eyeballs, crushed ice brains and skull glasses…what a delicious combination!
These skull glasses are actually jars and are the perfect vessel for a spooky drink.
But no worries if you don’t have them, other clear glasses such as cocktail glasses, mason jars or tumblers would work nicely too.
The glasses for these spooky drinks are decorated on the outside with black candy melts and candy sprinkles.

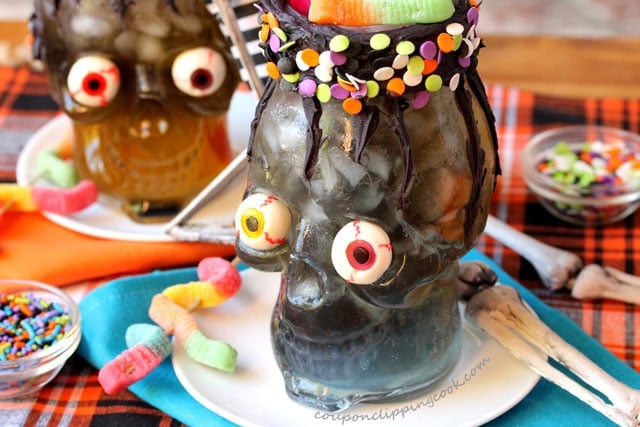
And then there’s the soft gel-like candy eyeballs that just happen to fit inside of the eye indentations in the skull glass.
But if another type of glass is used, an option is to lay the candy eyeballs at the very top of the drink on the ice, or inside of the drink floating would be fun too.
About the Blue and Orange Colored Layers
The blue color in these drinks is made with Sunkist Berry Lemonade soda, and the orange color is from orange soda.
So, for the colored layers of soda, I’ve found that the trick to getting the “colored layer look” is to pack the glass with crushed ice before pouring the soda in it.
But the best layered look seems to be when pouring the light blue soda first (so it’s the bottom layer), and then adding the orange soda on top.
When adding the orange soda first and the blue soda second, the blue soda tends to blend in more with the orange soda rather than creating layers of color.
But it does change the bright orange soda to a lighter color with a hint of gray which is a nice contrast to the black layer.
For the Black Layer
Lastly, in addition to the blue and orange sodas, a tiny bit of black gel food coloring is added which eventually starts to “sink” into the drink on its own to form a blackish looking layer.
Only the smallest amount of black gel food coloring is used since a little tends to go a super long way.
In this recipe just 1/2 of a drop of the black food coloring is added per drink which can be done by barely squeezing the tube of food coloring so just a little comes out.
These drinks should be served right after making them when they look their best before the ice starts to melt.
Let’s check out the ingredients.

Soda – Light blue Berry Lemonade, and Orange Soda

Garnish and Serving Glass Decor – Sour Brite Crawlers (multi-flavored gummy worms), Black Candy Melts, Halloween candy sprinkles and soft gel-like large candy eyeballs (optional)
Spooky Halloween Drinks – crushed ice, light blue and orange soda and black gel food coloring
Serving:
- Glass skull jars (or your preferred serving glass)
- Sturdy tall straws (sturdy enough to keep their shape when crushed ice is packed around them)
- Long cocktail picks (used for the gummy worm garnish; needs to be long enough to lay across the diameter of the serving glass)
HOW TO MAKE THIS RECIPE
A printable recipe with the measurements and instructions is located at the bottom of this post.
For the Serving Glass Decor:

Candy Melts – In a small microwave-safe bowl, add the black candy melts.

Cover the bowl with a paper towel and heat in the microwave for 40 seconds.

Next,

…stir the candy melts until they start to soften.
The bowl may be warm enough to continue to melt the candy.
After stirring, if they’re not completely melted, cover the bowl with a paper towel and warm them just a little bit more in the microwave (about 20 seconds).
Be careful not to overheat the candy melts.

Stir the melted candy until its smooth.

Rim of the Serving Glasses – Turn the serving glass upside down and put the rim of the glass in the melted candy.

Twist the glass around until the melted candy covers the area around the rim of the glass.

Then lift the glass from the melted candy…

…and using a spoon…

…even out the melted candy around the rim of the glass.
Use the spoon to add more melted candy to the glass if needed.

Then quickly, before the melted candy on the rim of the glass sets (dries), add candy sprinkles to it.

Repeat the process for the other serving glass/glasses.

After decorating the rim of the serving glasses, an option is to add scary strands or jagged lines hanging down from the top of the glasses by using the edge of a small spoon and the melted candy.

Next, chill the decorated serving glasses in the refrigerator so that the black candy coating will set (about 25 minutes).
While the serving glasses are chilling, make the gummy worm garnish.
Garnish:

Gummy Worms – On a long cocktail toothpick, thread the gummy worms with the “ridged” side up.

They can be threaded to look like a crawling worm or a long worm.

Thread as many worms that will fit on the cocktail pick (about 3 gummy worms).

An option is to make 2 gummy worm cocktail picks per serving for added color.
Set aside.

Candy Eyeballs – As an option, if using skull jars as serving glasses, gel-like candy eyeballs (about 3/4-inch in diameter) should fit inside the indentations on the jars where the eyes are.

Just before assembling the drinks, put the candy eyeballs inside the indentations on the front of the skull jars.
Alternatively, the candy eyeballs can set on top of the ice at the very top of the serving glasses as additional garnish.
Assembling the Drinks:

Fill the serving glasses half full with crushed ice.
Then insert the straws into the crushed ice.
Fill the glasses to the top with more ice (also add the ice around the straws).
LIGHT BLUE DRINK:

Slowly fill the glass 3/4’s full with the light blue soda.
After adding the soda, the ice may settle.
If so, add more crushed ice to the top of the glass.

Slowly add the orange soda to the glass so that it fills the glass to just under the rim.

On top of the ice in the middle of the glass, add about 1/2 of a drop of black gel food coloring (squeeze the tube very lightly so that just a tiny amount of coloring goes into the drink).

Next…

…using a wood skewer or one of the cocktail picks, gently poke the black coloring very slightly (about 1/2-inch) into the drink.
And that’s it. The black color should slightly sink on its own.
TIP – DON’T STIR THE DRINK.
THE IDEA IS TO KEEP THE BLUE, ORANGE AND BLACK COLORS AS UNDISTURBED AS POSSIBLE, so that there are layers of color.

Top with the gummy worm garnish….

…and serve right away.
ORANGE DRINK:
When adding the light blue soda to the glass after adding the orange soda, the separate colors aren’t as noticeable as they are when adding the blue soda first.
But the blue soda does change the shade of orange to a lighter color.

Slowly pour the orange soda into the glass (over the crushed ice) until the soda fills the glass 3/4’s full.
If the ice level has decreased, add more crushed ice until it fills the glass to the top.

Slowly add the light blue soda to the glass so that it fills the glass to just under the rim.

On top of the ice in the middle of the glass, add about 1/2 of a drop of black gel food coloring (squeeze the tube very lightly so that just a tiny amount of coloring goes into the drink).

Using a wood skewer or a cocktail pick, gently poke the black coloring very slightly (about 1/2-inch) into the drink.

And that’s it. The black color should slightly sink on its own.

TIP – DON’T STIR THE DRINK.

THE IDEA IS TO KEEP THE BLUE, ORANGE AND BLACK COLORS AS UNDISTURBED AS POSSIBLE.

Top with gummy worm garnish…

…and serve right away.

Then, enjoy each and every…

…spooky sip.
Thank you so much for stopping by CCC!
SUBSCRIBE TO CCC
Don’t Miss a CCC Recipe! Subscribe now to Coupon Clipping Cook and get an email each time we have a new post. CLICK HERE TO SUBSCRIBE TO COUPON CLIPPING COOK.

Spooky Halloween Blue and Orange Non-Alcoholic Drinks
Ingredients
Decor for the Serving Glasses:
- Approximately 20 Black Candy Melts amount may vary depending on the size of the serving glasses
- Halloween candy sprinkles
For the Garnish:
- 12 Trolli Sour Brite Crawlers (candy gummy worms)
- 4 Soft gel-like large candy eyeballs optional
For the Drinks:
- Approximately 14 ounces Sunkist Berry Lemonade Soda (light blue color) amount may vary depending on the size of the serving glasses
- Approximately 14 ounces Orange Soda amount may vary depending on the size of the serving glasses
- 2-1/2 cups crushed ice more or less depending on the size of the serving glasses
- 1 drop black gel food coloring (1/2 drop per serving)
- Garnish
Equipment
- 2 Glass skull jars (16 ounces), or other type of serving glasses
- Sturdy tall straws
- 4 Long cocktail picks (for the gummy worm garnish)
- 2 long cocktail picks (to slightly push the black food coloring into the drink)
Instructions
Decor for the Serving Glasses:
- For the Candy Melts – In a small microwave-safe bowl, add the black candy melts. Cover the bowl with a paper towel and heat in the microwave for 40 seconds. Stir the candy melts until they start to soften.
- The bowl may be warm enough to continue to melt the candy. After stirring, if they're not completely melted, cover the bowl with a paper towel and warm them just a little bit more in the microwave (about 20 seconds). Be careful not to overheat the candy melts. Stir the melted candy until its smooth.
- For the Rim of the Serving Glasses – Turn the serving glass upside down and put the rim of the glass in the melted candy. Twist the glass around until the melted candy covers the area around the rim of the glass.
- Then lift the glass from the melted candy. Using a spoon, even out the melted candy around the rim of the glass. Use the spoon to add more melted candy to the glass if needed.
- Then quickly, before the melted candy on the rim of the glass sets (dries), add candy sprinkles to it. Repeat the process for the other serving glass/glasses.
- After decorating the rim of the serving glasses, an option is to add scary strands or jagged lines around the top of the glasses by using a small spoon to spread some of the remaining candy melts in the bowl (which may need to be slightly melted again in the microwave).
- Chill the decorated serving glasses in the refrigerator so that the black candy coating will set (about 25 minutes).While the serving glasses are chilling, make the gummy worm garnish.
For the Garnish:
- For the Gummy Worms – On a long cocktail toothpick, thread the gummy worms with the "ridged" side up. They can be threaded to look like a crawling worm or a long worm.
- Thread as many worms that will fit on the cocktail pick (about 3 gummy worms). An option is to make 2 gummy worm cocktail picks per serving for added color. Set aside.
- For the Candy Eyeballs – As an option, if using skull jars as serving glasses, gel-like candy eyeballs (about 3/4-inch in diameter) should fit inside the indentations on the jars where the eyes are.
- Just before assembling the drinks, put the candy eyeballs inside the indentations on the front of the skull jars. Alternatively, the candy eyeballs can set on top of the ice at the very top of the serving glasses as additional garnish.
Assembling the Drinks:
- Fill the serving glasses half full with crushed ice. Then insert the straws into the crushed ice. Fill the glasses to the top with more ice (also add the ice around the straws).
- FOR THE LIGHT BLUE DRINK: Slowly fill the glass 3/4's full with the light blue soda. After adding the soda, the ice may settle. If so, add more crushed ice to the top of the glass. Slowly add the orange soda to the glass so that it fills the glass to just under the rim.
- For the Black Gel Food Coloring – On top of the ice in the middle of the glass, add about 1/2 of a drop of black gel food coloring (squeeze the tube very lightly so that just a tiny amount of coloring goes into the drink).
- Using a wood skewer or one of the cocktail picks, gently poke the black food coloring very slightly (about 1/2-inch) into the drink. And that's it. The black color should slightly sink on its own.
- DON'T STIR THE DRINK. THE IDEA IS TO KEEP THE BLUE, ORANGE AND BLACK COLORS AS UNDISTURBED AS POSSIBLE so that there are layers of color.
- FOR THE ORANGE DRINK: Repeat the same process, only add the orange soda first and the blue soda second. Repeat the same process when adding the black gel food coloring.
- Top with the gummy worm garnish and serve right away.
Notes
TIP:
- Don’t stir the drinks. The idea is to keep the blue, orange and black colors as undisturbed as possible so that there are layers of color.
Halloween Recipes
More Halloween recipes you may like “Decorated Halloween Graveyard S’mores“, “Chocolate Cupcakes with Tootsie Roll Goblins” and “Halloween Creepy Crawler Chocolate Spiders“.
Colorful Drink Recipes
Colorful Drinks You May Like:
Very Cherry Shirley Temple with Lime
Raspberry Mango Swirl Smoothie
More Holiday Recipes
More Holday Recipes:
Jelly Bean Cupcakes with Jelly Bellys Inside and Out
Bunny Bottom Chocolate Dirt Dessert Cups