Simple Homemade Fried Chicken
Simple and delicious fried chicken doesn’t get much better than this.

There are so many delicious recipes for fried chicken out there.
They vary based on the spices and coatings used, as well as the methods applied for coating the chicken.
This recipe is the exact same one that my grandmother made only she used vegetable oil.
The only change I made is that I use canola oil.
About the Ingredients
This recipe only has 5 ingredients (chicken, salt, pepper, flour and oil).
Sometimes I just can’t resist, and I’ll add some more spices but I’m always sorry I did.
It just doesn’t taste as good as when only using salt and pepper.
This is definitely one of those recipes where less is more.
Serving
This fried chicken is so delicious served warm or chilled right out of the fridge.
And the crunchy bits in the bottom of the skillet make the most delicious gravy too.
Let’s check out the ingredients.
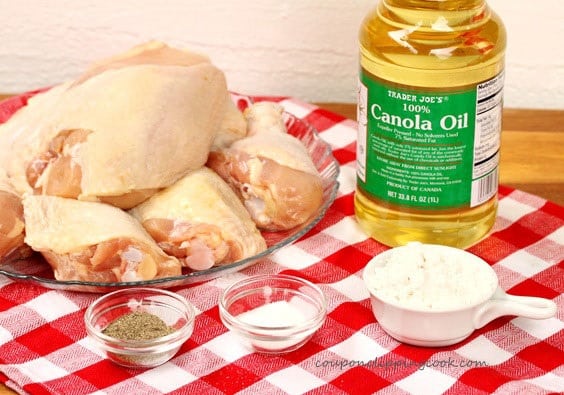
Fried Chicken – One whole fryer chicken (cut up), salt, pepper, flour and canola oil
Equipment – small cooking rack, large plate and large shallow bowl
HOW TO MAKE THIS RECIPE
A printable recipe with the measurements and instructions is located at the bottom of this post.
Season the Chicken

Lay the pieces of raw chicken on a large plate.

Sprinkle pepper and…

…salt, evenly on each side of the chicken.
Coat the Chicken with Flour

Add flour in a large shallow bowl.

Generously coat each piece of seasoned chicken in flour on all sides.
Set aside for a moment.
Fry the Chicken

In a large skillet, add canola oil so that it’s about 1/2-inch deep in the pan.
TIP – Depending on the size of your skillet, you may need to add additional canola oil.
Also, if frying the chicken in multiple batches, additional oil may be needed.

Heat the skillet on medium heat.

Add a pinch of flour to the oil.
When the flour starts to sizzle…

…carefully add each piece of flour-coated chicken into the pan.
Leave space in between the pieces of chicken so not to overcrowd the pan.
Depending on the size of the skillet, a second batch may be needed to finish frying any remaining pieces of the chicken.

Using a cooking or carving fork, turn the chicken regularly as it turns a golden color.

Try to poke the fork into the outside edges of the skin when turning the chicken rather than in the middle of the meat (so the juices don’t run out).
When turning the chicken, a cooking fork tends to keep the crispy skin looking nicer, than when using tongs.
If the oil starts to bubble quickly or splatter out of the skillet, turn the heat down.

Keep an eye on the chicken to see if it’s turning a dark brown color (rather than a golden color) or cooking too quickly.
If so, turn the heat down a little bit.
Continue to fry the chicken until all sides are a medium to dark golden color, and the chicken is thoroughly cooked (about 30 to 40 minutes).
The larger pieces of chicken like the breasts, may take the longest time to cook.
Transfer the Fried Chicken onto a Cooking Rack
Set a small cooking rack on top of a large plate.

When the pieces of chicken are done cooking, transfer them from the skillet onto the cooking rack (to drain off any excess oil).
Serve
Serve the cooked chicken warm, or chilled right out of the fridge.

It’s delicious served warm with mashed potatoes and gravy, or cold for lunch, or as a late-night snack.

Thank you so much for stopping by CCC!
SUBSCRIBE TO CCC
Don’t Miss a CCC Recipe! Subscribe now to Coupon Clipping Cook and get an email each time we have a new post. CLICK HERE TO SUBSCRIBE TO COUPON CLIPPING COOK.

Simple Homemade Fried Chicken
Ingredients
- 1 whole cut-up fryer chicken
- 1 tablespoon (heaping) ground black pepper
- 3 teaspoons salt
- 1-1/2 cups all-purpose flour
- 1-1/2 to 2 cups canola oil (amount depends on the skillet size and number of batches)
Equipment
- Small cooking rack (for draining any excess oil from the fried chicken)
- Large plate (to lay the cooking rack on)
- Large shallow bowl (to put the flour in)
Instructions
Preparation
- Cooking Rack – Lay a small cooking rack over a large plate and set aside.The fried chicken is transferred onto the rack to drain off any excess oil after cooking.
- Large Shallow Bowl – To a large shallow bowl, add the flour. Set aside.
Season the Chicken
- Evenly sprinkle salt and pepper on both sides of each piece of chicken.
Coat Chicken with Flour
- Generously coat the seasoned chicken in flour on all sides. Set aside for a moment.
Fry the Chicken
- To a large skillet, add canola oil so that it’s about 1/2-inch deep in the pan. Depending on the size of the skillet and, or if frying the chicken in multiple batches, you may need to add more oil.
- Heat the skillet on medium heat.
- Add a pinch of flour to the pan. When the flour sizzles, carefully add the pieces of chicken to the skillet. Make sure to leave space in between each piece of chicken so not to overcrowd the pan.
- Depending on the size of the skillet, some of the chicken may need to be cooked in a second batch.
- Turning the Chicken – Using a cooking or carving fork, turn the chicken regularly as it turns a golden color. Try to poke the fork into the outside edges of the skin when turning the chicken rather than in the middle of the meat (so the juices don’t run out). When turning the chicken, a cooking fork tends to keep the crispy skin looking nicer than when using tongs.
- If the oil starts to bubble quickly or splatter out of the skillet, turn the heat down.Keep an eye on the chicken to see if it’s turning a dark brown color (rather than a golden color) or cooking too quickly. If so, turn the heat down.
- Let the chicken cook until all sides are a medium to dark golden color and the chicken is thoroughly cooked. When the pieces of chicken are done cooking (about 30 to 40 minutes), transfer them from the skillet onto the cooking rack (that is laying on a large plate). The larger pieces of chicken like the breasts may take the longest time to cook.
Serve
- Serve this fried chicken warm, or chilled right out of the fridge. It's elicious served warm with mashed potatoes and gravy, or cold for lunch, or as a late-night snack.
Video
Notes
TIPS:
- The amount of cooking time may vary depending on the size of skillet used and number of batches needed to fry the chicken.
- The crispy crumbles left in the bottom of the pan make the most delicious gravy.
- The recipe post on CCC entitled “Fried Chicken and Bacon Gravy Sliders” shows how to make the gravy after frying the chicken.
Serving Suggestions
This fried chicken tastes wonderful served with vegetables and potatoes and, or macaroni and cheese.
Recipe for Making Gravy from Fried Chicken Drippings
Here’s a recipe showing how to make the gravy…”Fried Chicken and Bacon Gravy Sliders“, it’s really good even without the bacon.
Mashed Potato Recipes
And here are some mashed potato recipes “Roasted Garlic and Rosemary Mashed Potatoes” and “Smoked Gouda and Garlic Mashed Potatoes“.
Comfort Food Recipes
Comfort Food Recipes you may like:
Candied Yams (Sweet Potatoes) with Pecans and Marshmallows
Candied Sweet Potatoes (Canned Yams), with Walnuts and Marshmallows
Baked Herb and Parmesan Potato Slices
Biscoff Cookie Butter Blondie Brownies


This is exactly what I was looking for! The recipe is simple, and the instructions are easy to understand. Sometimes I want a plain old recipe, but I can only find “fancy” ones, ones with twenty ingredients and as many steps.
I have been cooking for decades, but I seldom fry chicken, so I wanted to make sure I do this correctly. Frying tomorrow!
Thank you!
Hi Marti, thank you so much for your very nice comment!
Simple and delicious! I used my fry daddy instead of a skillet, which I recommend. Also, if you want extra crispy, add egg wash after flour followed by panko crumbs. My whole family loves this recipe!
Hi Jason, I’m so glad you liked this. And your extra ingredients for extra crispy chicken sounds delicious. Thank you so much for your great recipe rating too!
I’ve never fried chicken before and I was nervous, but it turned out perfect!
Hi Ginger, I’m so glad you liked it! Thank you for letting me know and thank you so much for your great rating!
Great recipe! Just how my family used to make it ! Thank you cause I couldn’t remember how to make it.
Hi Susan, oh good. I’m so glad you like this recipe. Thank you so much for letting me know and for your great recipe rating too!
Wonderful!!!
Thank you!
Delicious!!!
Thank you!
This is the easiest yet most delicious fried chicken I ever made. Tastes like my mom cooked it! She used the same simple ingredients. What I loved most is that there was no spattering of oil anywhere, especially on my arms, except in the skillet. Thanks for each step by step direction! Thanks to this recipe, I am able to fry chicken without a mess & know it will be delicious!
Hi Tanya, I’m so glad you liked this fried chicken! Thank you for letting me know how it turned out for you too!
This is the recipe my mom, and her mom, etc. used back in the day. With cast iron skillets. My mom used gobs of Crisco shortening. It tasted just like this recipe. I keep coming back to this recipe, even though I know it by heart now, because everthing about this presentation is so wonderful and “homey”. The tone, the photography, that red and white checked cloth. Very Americana. I just love visiting this page. : )
Hi Susan, my grandmother used gobs of Crisco shortening too for this recipe! I’m so glad you like this page and you noticed the red and white checked cloth! I like to use that for my home-cooking kind of posts. I really appreciate your very nice comment. Thank you so much for your visits!
Thank you soo much for this recipe. I have looked online and saw other recipes but they had some stupid nonsense like lard etc but yours was perfect. It had simple instructions and ingredients that was perfect as we had it at home 🙂
THANK U! For adding pics to demonstrate how its supposed to be luike so none of us get confused 🙂 THANKS ALOT. That really helped 🙂
Hi Amy, I’m so glad you liked this recipe. Thank you so much for stopping by and for letting me know how it turned out!
Made fried chicken inspired by your recipe! Thanks for posting it. 🙂 Tastes great! Always good to have a very simple recipe.
Hi There, I’m so glad you liked it! Thank you for letting me know. Yes, I do like simple recipes too. Have a nice rest of the weekend!
Wow! That looks absolutely delicious! One of my favorite dishes that I seldom make….you make it look easy and doable! Thanks!
Hi Ann! Thank you very much!